
Volumes
Every deploy starts your service in fresh containers. A volume is a folder that survives: whatever your service writes there is still there after deploys and restarts. Use one for uploads, a SQLite file or a database's data. Databases come with one.
Think of a volume as a disk plugged into one of your servers: every service that mounts it runs on that server.
Add a volume
Section titled “Add a volume”- Open your environment and click Create, then Volume. Right-clicking the canvas works too.
- Enter a Name, like
uploads, and a Storage limit (GB). It's fixed once you deploy, so leave room to grow. Click Create volume. - Click the new volume. Under Mount on a service, pick the service, enter a path inside
its containers, like
/app/uploads, and click Mount. - Click Deploy.
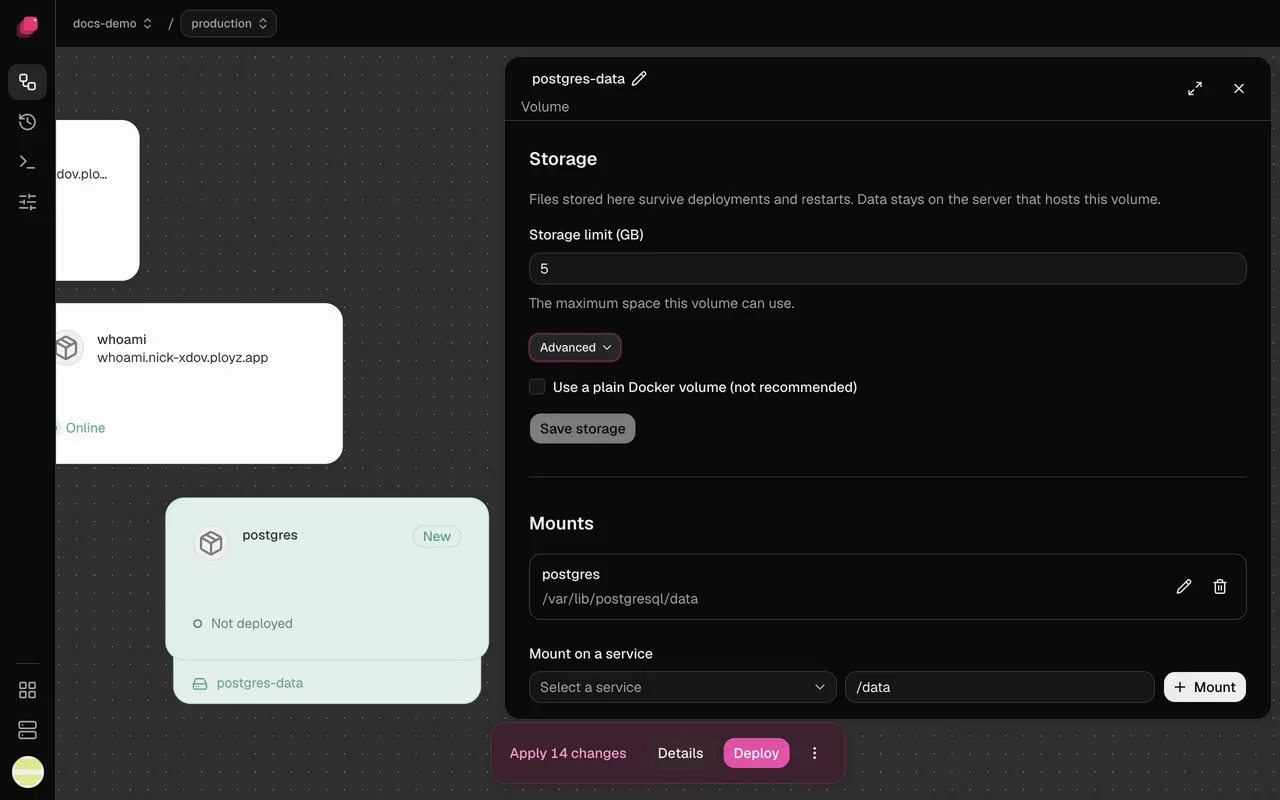
The volume shows as a tray under the service's card, and your app reads and writes files at that path. To change the path, click the pencil next to the mount.
Choose the storage limit
Section titled “Choose the storage limit”The limit starts at 5 GB. A volume can't grow past it: once it's full, writes fail. The whole limit is set aside on the server's disk, so a deploy fails if no server has room for it.
Choose with care. You can change the limit under Storage in the volume's panel until you
deploy the volume; after that it's fixed, even if that deploy failed. Ployz can't resize a
volume yet. To get more room, add a bigger volume, mount it in the same service at another
path, copy the files across with ployz exec, then swap the mount paths.
The dashboard doesn't show how full a volume is yet:
# CLI-only for now: how full is web's volume?
ployz exec web -- df -h /app/uploads
Share a volume
Section titled “Share a volume”By default, only one container writes to a volume. A service with a volume runs one replica, and no other service can mount it. To run more replicas, or to mount it in several services, turn on shared writes. This is CLI-only for now:
ployz volume set uploads --shared-writesDo this only if your app copes with several writers at once; a database's data directory doesn't. Everything that mounts the volume still runs on its server.
When its server goes down
Section titled “When its server goes down”The services that mount the volume stop until the server is back. Nothing moves to another server. To keep deploying your other services meanwhile, see When a server goes down.
When your servers show Docker only
Section titled “When your servers show Docker only”A volume needs a server that shows Managed volumes available on the Servers page. A server added with Start without it shows Docker only instead. If none of your servers has managed volumes, deploying a volume fails, including the one a database gets.
Add a server with managed volumes, or, before you deploy, open the volume and tick Use a plain Docker volume (not recommended) under Advanced. It has no storage limit, so it can fill the server's disk.
Detach a volume
Section titled “Detach a volume”In the volume's panel, click the trash icon next to a mount (Remove mount (keeps the data)), then deploy. The volume and its data stay.
Delete a volume
Section titled “Delete a volume”Deleting a deployed volume deletes its data from your servers for good.
- Open the volume and click Delete volume under Danger. Keep volume undoes it.
- Click Delete data, or Deploy.
- Ployz shows Deploy deletes data with what goes. Type your
project/environment, likemy-app/production, and click Deploy.
A volume that was never deployed holds no data, so it goes on your next deploy without asking.